JAPANESE INDEX TOP
PRE-RIDE INSPECTION
|
If the Pre-ride Inspection is not performed, serious damage or an accident may result. |
Inspect your motorcycle every day before you ride it. The items listed
here will only take a few minutes to check, and in the long run they can
save time, expense and possibly you life.
- Engine oil level – add engine oil if required. Check for leaks.
- Fuel level – fill the fuel tank when necessary. Check for leaks.
- Brakes – check operation. Adjust free play if necessary.
- Tyres – check condition and pressure.
- Drive chain – check condition and slack. Adjust and lubricate if necessary.
- Throttle – check for smooth opening and full closing in all steering positions.
- Lights and horn – check that headlight, tail/brake light, turn signals, indicators
and horn function properly. - Engine stop switch – check for proper function.
- Battery electolyte – check the level and add if necessary. ( UB, NZ type )
Correct any discrepancy before you ride. Contact your authorized Honda
dealer for assistance if you cannot correct the problem.
STARTING THE ENGINE
|
Never run the engine in an enclosed area. The exhaust contains poisonous Attempting to start the engine with the transmission in gear and the clutch |
Preparation
- Lock the parking brake. ( UY type only )
- Make sure the transmission is in neutral and the fuel cock is ON.
- Insert the key in the ignition switch and turn to ON. The neutral indicator
( green ) should go on. - Make sure the engine stop switch is in RUN.
- Retract the right side stand.
Starting Procedure
Cold engine
- Raise the choke lever (1) to Fully ON (A).
- Open the throttle slightly and operate the kickstarter with the right foot,
starting from the top of the stroke and following through to the bottom
with a rapid and continuous kick.CAUTION Do not allow the kickstarter to snap back freely against the pedal stop
as engine case damage could result. - Warm up the engine at approx. 1,500 rpm until it runs smoothly with the
choke lever Fully OFF (B).
Starting in Extremely Cold Weather
Prime the engine before starting by cranking the engine several times with
the kickstarter. The ignition switch should be OFF, the choke lever Fully
ON (A) and the throttle opened slightly. Follow the “ Cold Engine ” Starting
Procedure.
Flooded Engine
If the engine fails to start after several repeated attempts, it may have
become flooded with excess fuel. To clear the engine, turn off the engine
stop switch and lower the choke lever to Fully OFF (B). Open the throttle
fully and crank the engine several times with the kickstarter. Turn the
engine stop switch to RUN and open the throttle slightly; start the engine
using the kickstarter.
RUNNING-IN
During the first 1,000 km ( 600 miles ) , do not operate the motorcycle
at more than 80 % of the maximum speed in any gear. A void full throttle
operation, and do not operate for a long time at one speed. During initial
running in, newly machined surgaces will be in contact with each other
and these surfaces will wear in quickly. Running-in Maintenance at 1,000
km ( 600 miles ) is designed to compensate for this initial minor wear.
Timely performance of the running-in maintenance will ensure optimum service
life and performance from the engine.
RIDING
|
Review Motorcycle Safety before you ride. Make sure the side stand is fully retracted before riding the motorcycle. |
|
|
Make sure the function of the side stand mechanism. See MAINTENANCE SCHEDULE and explanation for SIDE STAND. |
- Warm up the engine.
- With the engine idling, shift into low ( 1st ) by depressing the heel end
of the gearshift pedal. - Slowly open the throttlw to start the motorcycle rolling smoothly, and
when the motorcycle attains a moderate speed, close the throttle and depress
the gearshift pedal with the heel to shift int 2nd gear. - This sequence is repeated to progressively shift into the next higher gear.
- Shifting down is accomplished by depressing the toe end of the gearshift
pedal. - Coordinate the throttle and brakes for smooth deceleration.
- Both front and rear brakes should be used at the same time and should not
be applied strongly enough to lock the wheel, or braking effectiveness
will be reduced and control of the motorcycle be defficult.

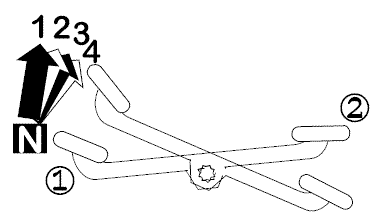
(1) Toe end (2) Heel end
High-Low Speed Range Selector Lever ( UB , NZ )
The speed range selector lever (1) is located on the left crankcase cover
at the bottom side of the positorque cover. When additional power is required
for climbing a steep grade or riding with a heavy load, shifting the selector
lever to the “ L ” range will provide the necessary power.
To shift posi-torque:
- Stop the engine.
- Place main transmission in neutral.
- Move rear wheel slowly by hand while turning selector lever.
(1) Speed range selector lever
BRAKING
- For normal braking, gradually apply both the front and rear brakes while
downshifting to suit your road speed. - For maximum deceleration, close the throttle and apply the front and rear
brakes firmly.
|
|
PARKING
- After stopping the motorcycle, shift the transmission into neutral, turn
the fuel cock OFF, turn the handlebar all the way to the left, turn the
ignition switch OFF and remove the key. - Use the side stand or center stand to support the motorcycle while parked.
CAUTION - Park the motorcycle on firm, level ground to prevent it from falling over.
- If you park on a slight incline, aim the front of the motorcycle uphill
to reduce the possibility of rolling off the side stand or overturning.
- Lock the steering to help prevent theft.
ANTI-THEFT TIPS
- Always lock the steering and never leave the key in the ignition switch
( UB, NZ ) in the steering lock ( UY ). This sounds simple but people do forget. - Be sure the registration information for your motorcycle is accurate and
current. - Park your motorcycle in a locked garage whenever possible.
- Use an additional anti-theft device of good quality.
- Put your name, address and phone number in this Owner’s Manual and keep
it on your motorcycle at all times. Many times stolen motorcycles are identified
by information in the Owner’s Manuals that are still with them.
コメント